RESTX Spec Concept
One of the strong features of RESTX is its concept of spec. Here is how it looks like:
title: should say hello
given:
  - time: 2013-03-31T14:33:18.272+02:00
wts:
  - when: GET message?who=xavier
    then: |
      {"message":"hello xavier, it's 14:33:18"}
View source in a sample project More examples
This file specifies your REST API by telling what it should respond (the then) to a specific request (the when) given a current state of the system (the given).
Usage
What’s interesting is that single file can be used for multiple purposes:
Testing
RESTX provides a JUnit Rule which helps to execute specs as an integration tests:
- it starts up an embedded RESTX server for you
- it prepares the state of the system according to the
givensection of your spec files - it issues the specified requests, and verifies the expected responses
Here is an example of how to use this feature:
@RunWith(RestxSpecTestsRunner.class)
@FindSpecsIn("specs/hello")
public class HelloResourceSpecTest {
}This feature could be used on a non RESTX server (if you didn't use RESTX to develop your server).
Watch this issue to notify your interest.
When running the spec, the trickiest part is the given.
In the example above it only sets the time. This is achieved using Joda Time API, and only works if you use Joda Time yourself in your implementation. But it allows to test something that rely on DateTime.now() very easily. In general it’s good to specify the time in your spec, as it is also used when RESTX signs content as part of its client side session support.
But the entries you can put in your given section is pluggable, so for instance the restx-jongo-specs-tests provides a given item to import data in a MongoDB collection.
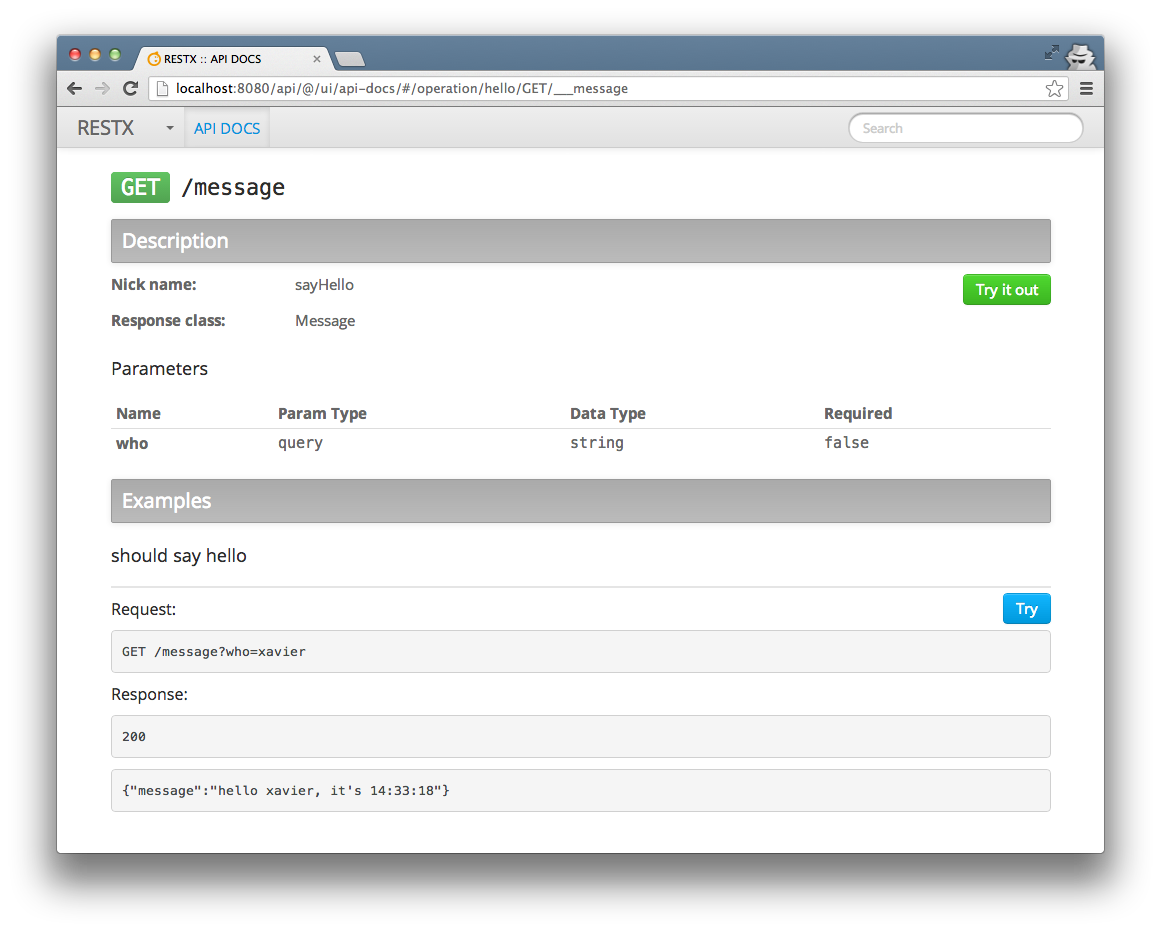
Examples in API Docs
RESTX provides a module to add API Docs entry to the RESTX admin web console. This docs is inspired by Swagger UI and is very helpful if you want to publish your API for other developers to use them, or simply for front-end developers (it not only documents but also allow to try the REST API very easily).
What RESTX adds to this concept is that it integrates the specs you write as examples inside this REST API doc. Think about it: it means you have meaningful examples in your doc, and you are sure they work since they are used in your automated tests! How neat is that :)
Here is an example of the web UI:
All you need to do to get that feature is include the restx-apidocs module in your dependencies and name your spec files with a .spec.yaml and it will be automatically discovered (Implementation source).
Possible reasons for not discovering a spec as example:
- your file is not named with a .spec.yaml extension
- your file is not in the classpath (maybe because your IDE didn't copy it to your target/classes or bin directory)
- the spec does not match the REST operation (if you are using the generated app, it eliminates this option)
Mock your HTTP requests
Last but not least the spec can be used to mock your HTTP requests (Implementation source).
So you can use them to specify what requests you want to implement, and actually use them as specified while the implementation is not yet complete. This allows to have a very good isolation between client and server developments, the spec is used as a contract between the two. And because the spec can be used both for mocking (for the client) and automated testing (for the server), you have very good chances that it will “just work” once you put the 2 together.
To use this feature, you will need to use the restx-specs-shell plugin for restx shell (use shell install command in the shell to install it).
Then launch the restx shell in a directory of your choice, and use spec server command:
restx> spec server
SPECS SERVER READY on http://localhost:8888/api/
type `stop` to stop the server, `help` to get help on available commands
spec-server> help
stop - to stop the server
open - open a browser on the spec server
help - this help

to add new routes simply create/edit .spec.yaml file in
current directory or subdirectories.
spec-server>
As the command tells you, it will discover .spec.yaml files in the current directory and any subdirectory. And it reloads them on the fly, so once the server is running you can update your specs or create new ones to benefit from them instantly. Note also that you can use the open command to open a browser on the spec server itself, where a route not found displays the list of available routes with something like this:
$ http http://localhost:8888/api/
HTTP/1.1 404 OK
Connection: keep-alive
Content-Type: text/plain; charset=UTF-8
Transfer-Encoding: chunked

no restx route found for GET /
routes:
-----------------------------------
-- routes defined by specs:
GET message?who=xavier (src/test/resources/cases/hello/should_say_hello.spec.yaml)
--
-----------------------------------
Recording
Because spec are so useful, RESTX makes it super easy to add specs to your RESTX project with a recording feature (Implementation sources: 1 2).
There are 2 ways to record requests: either you start your RESTX server in RECORDING mode, or you can record one request at a time when using the DEV mode.
Recording single requests
In the API docs, when you use “try it out” to be able to test your API, you not only have a “Send” button to send your request, you also have “Send & Record” and “Send & Fix”:
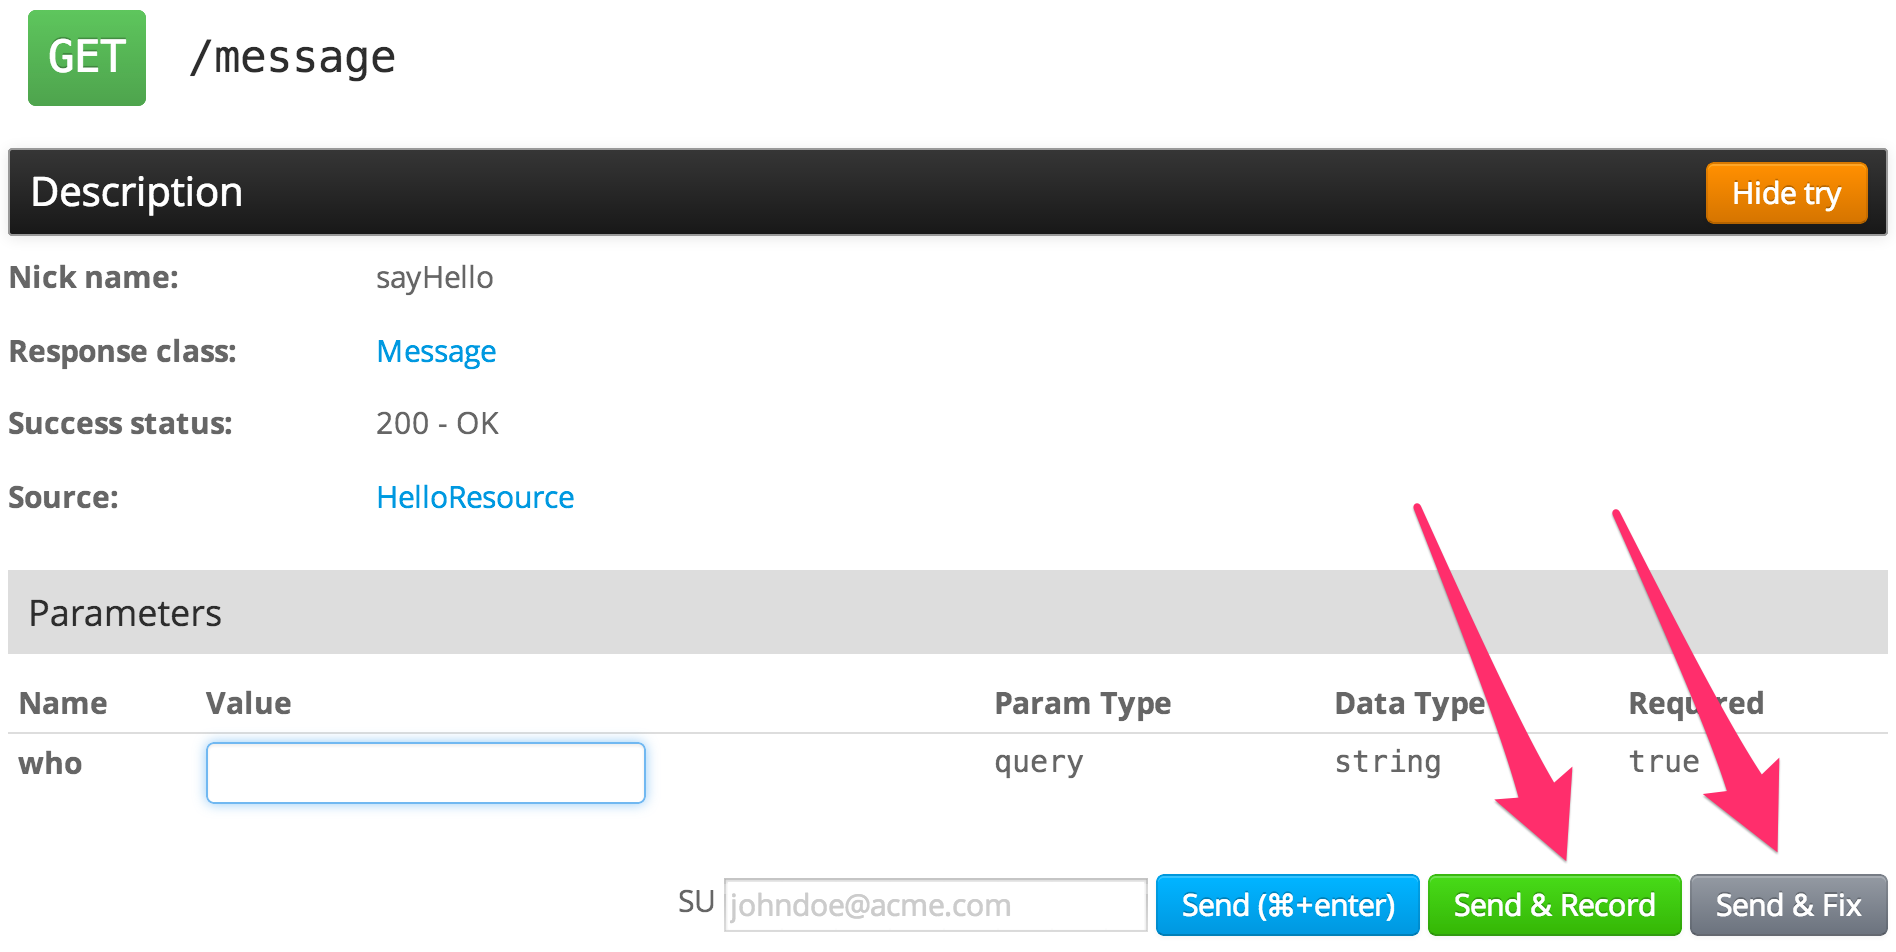
Using the “Send & record” button will send the request and records the corresponding spec. This is very useful to add examples to your API docs, and at the same time add non regression tests. But sometime you discover a bug while playing with your API in apidocs, and could like to record the request causing the problem with an expected result which is not the one you currently get. This is what “Send & Fix” is for: it will send the request, record the request and response but don’t save it as a spec yet, but rather send it back to apidocs so that you can edit the expected response, and then save the request + expected response as a new spec.
Recording mode
You start your RESTX server in recording mode, and use admin console to browse the recorded HTTP requests, and save them directly as spec files. This is useful if you want to record a bunch of requests, for instance while using your regular API client (your web app UI if you use your REST API inside your own web app).
To start the server in recording mode, you just need to use -Drestx.mode=recording as JVM option when launching your AppServer class, then you should see something like when starting the server:
22:58:42.273 [main             ] INFO  restx.RestxMainRouterFactory -
--------------------------------------
 -- RESTX READY >> RECORDING MODE <<
 -- 2 filters
 -- 19 routes
 -- for admin console,
 --   VISIT http://localhost:8086/api/@/ui/
 --
You can also do that with the shell with restx app run --mode=recording.
Then use your server as usual by calling it REST API issuing HTTP requests.
Then open the admin web console and go to the recorder page (sg like http://localhost:8086/api/@/ui/recorder/ ):
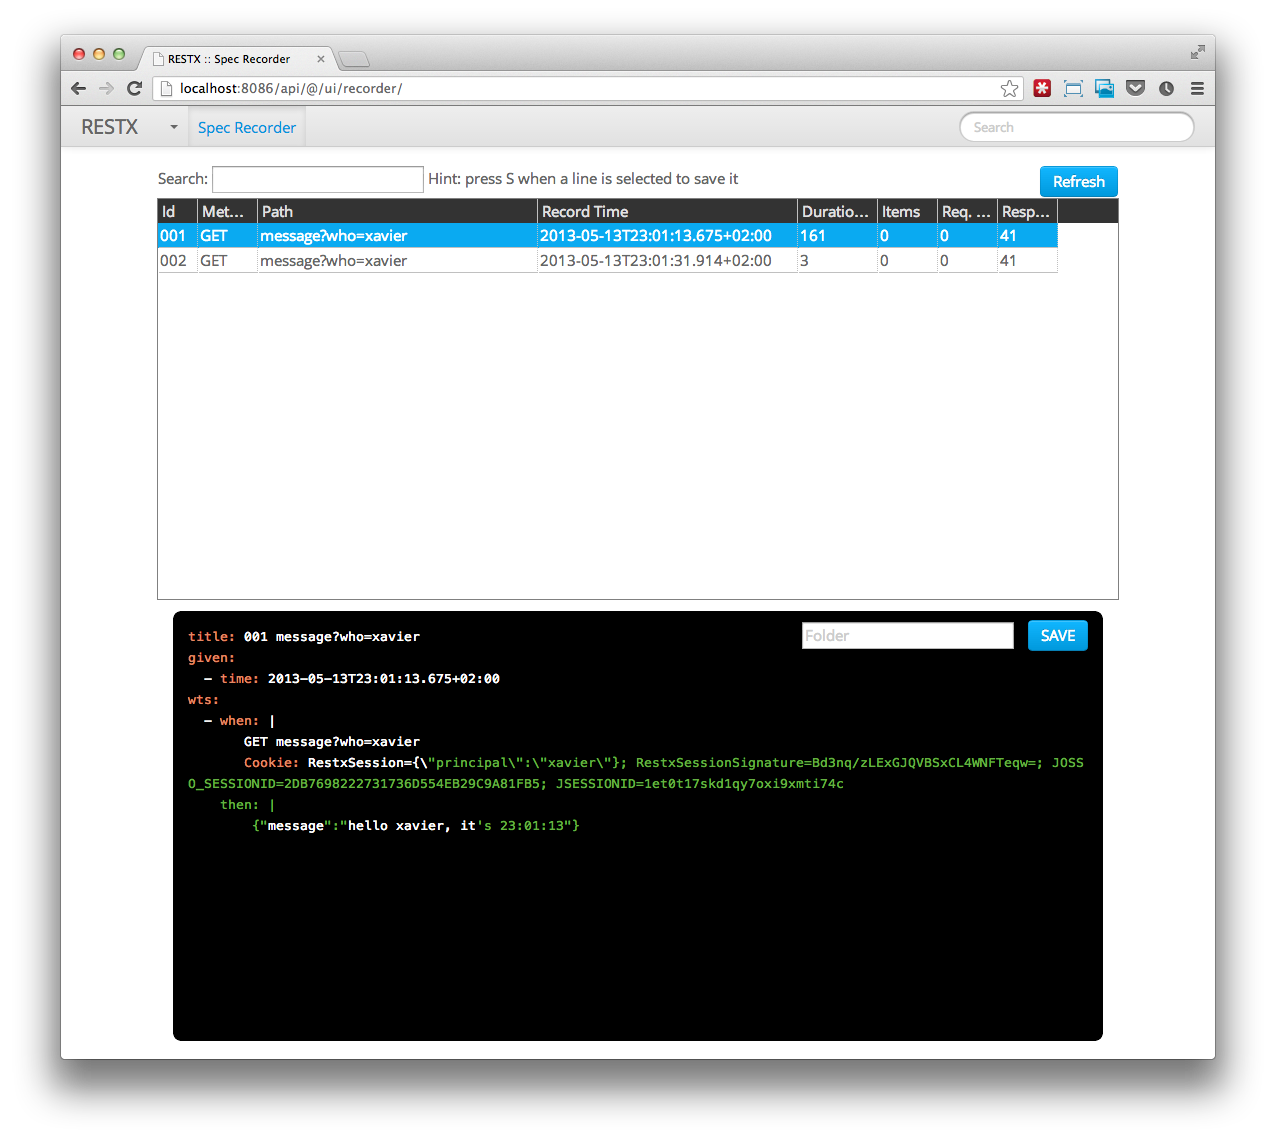
The UI is pretty straightforward to use, by pressing S or hitting the Save button you will save the currently selected spec file, which has been recorded when you were using your API. You can also specify a directory to store the files, relative to the current directory where the app server is run. When you press S it also moves to the next line, so saving a bunch of specs can be done very quickly.
As you see from the screenshot Cookies are recorded too, so authenticated requests can be reproduced as expected.
WARNING: when used in recording mode RESTX requests are significantly slower than usual, and don't run concurrently. DO NOT USE in production!
What is recorded
RESTX tries to record not only the request and the response, but also the external parts of the system so that the spec is replayable as is.
Currently, RESTX supports recording / replaying:
- the request
- the response
- the current time (using a custom thread safe version of JodaTime setCurrentMillisFixed)
- the RESTX session
- request cookies
- UUIDs generated with UUIDGenerator
Plus, if you use the jongo module:
- the state of Mongo collections used during the requests
- the Mongo OIDs generated during the request
Therefore you can very easily record and replay non regression integration tests which run lightning fast!
Moreover, the recording / replay facility is pluggable, so you can write your own recorder / spec loader / player and customize it to your own needs (ask for help on the google group).